Lag screws rely entirely on wood grain tension to hold a post tight. Over time, several factors cause this connection to break down:
- Wood Shrinkage and Expansion: As outdoor lumber goes through wet and dry seasons, it expands and contracts. This constant movement gradually backs the lag screw out or compresses the wood fibers around the threads, destroying their grip.
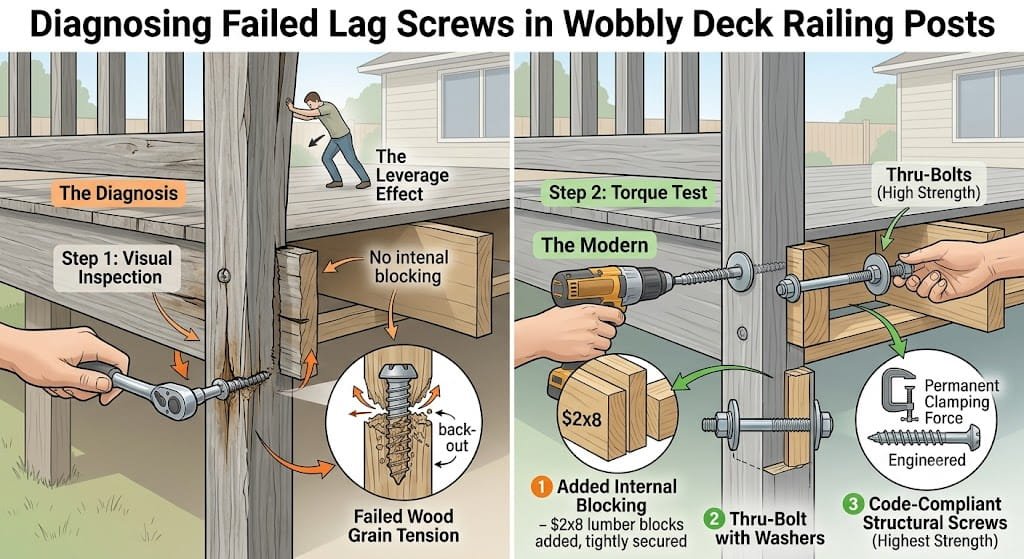
- The Leverage Effect: A standard railing post acts as a giant lever. When someone leans on the top of a 36-inch or 42-inch post, that force is multiplied exponentially at the base. Lag screws simply cannot handle that repetitive prying force.
- Corrosion and Rot: If non-galvanized or low-quality fasteners were used, they will rust and eat away at the surrounding wood. Furthermore, water often seeps into the pilot holes, causing internal rot that you can’t see from the outside.
Step-by-Step Diagnostic Protocol
Before jumping into a repair, you need to evaluate the exact state of the connection.
1. The Visual Inspection
Look closely at the base of the post while someone gently shakes the railing.
- Are the heads of the lag screws flush against the wood, or is there a visible gap?
- Is the wood around the screw head split, dark, or spongy?
2. The Torque Test
Take a ratchet or wrench and attempt to tighten the lag screw.
Immediate Structural Diagnostics Help
- If it spins freely: The wood fibers inside have completely stripped out, or the screw has snapped inside the framing.
- If it tightens slightly but feels “mushy”: The wood inside is rotting or severely degraded.
3. Check the Framing Behind the Post
A fastener is only as good as what it is anchored into. Crawl under the deck (if accessible) or look beneath the rim joist.
- Did the installer attach the post only to the outer rim joist without solid blocking behind it? If the rim joist itself is flexing, the lag screws will never hold.
The Verdict: Why You Shouldn’t Just “Tighten” Them
If a lag screw has failed, simply cranking it tighter or replacing it with a slightly larger lag screw is a temporary band-aid. The wood fibers inside the hole are already compromised. Within a few months, the wobble will return.
The Modern Solution: Upgrading to Thru-Bolts or Structural Screws
To achieve a permanent, code-compliant fix, you need to move away from traditional lag screws.
| Fastener Type | How it Works | Strength Rating |
| Traditional Lag Screw | Threads into the wood; relies on friction. | Low (Prone to backing out) |
| Thru-Bolts (with Washers & Nuts) | Passes completely through the post and joist, clamping them together with a nut and washer. | High (Excellent clamping force) |
| Code-Compliant Structural Screws | Specially engineered, heavy-duty heat-treated screws (like LedgerLOK or ThruLOK) designed specifically for deck tension zones. | Highest (Fast installation, code-approved) |
Best Practice Repair Steps:
- Remove the Old Lags: Back out the failed lag screws.
- Add Internal Blocking: Beef up the framing inside the deck joist bay using solid $2\times8$ or $2\times10$ lumber blocks tightly mechanically fastened to the joists.
- Through-Bolt the Connection: Drill completely through the post and the rim joist/blocking. Install $1/2\text{-inch}$ hot-dipped galvanized or stainless steel thru-bolts with washers on both sides, or use code-approved structural tension ties (like a Simpson Strong-Tie DTT2Z).
Subject Matter Context
Core Pillar Connection: This technical guide is part of our Diagnostics & Repair series. For comprehensive execution and guaranteed results in Canyon Lake, review our official protocol: Railing Repair & Maintenance.